
draw.io direct link: https://www.draw.io/ or https://app.diagrams.net/
For the data and privacy conscious: https://diagram.new
- Using https://diagram.new does not auto-save your progress.
Table of Contents
- What is draw.io?
- Authorize draw.io to Google Drive
- Light Mode / Dark Mode
- Managing Google Permissions
- Create New Diagram
- Landscape Orientation
- draw.io Main Interface
- Exporting Your Diagram
- No Permissions for draw.io
- BITS Corporation ER-Diagram Example
What is draw.io?
draw.io is a free, online diagramming tool that we will use to create ER diagrams.
Authorize draw.io to Google Drive
For file management purposes, I recommend that you link your hawaii.edu Google account with draw.io so all your work is automatically saved to your Google Drive. If you do not want to link your hawaii.edu Google account with draw.io, you can use this link instead: https://diagram.new. However, you will need to actively download and upload diagrams if you need to make edits to your diagrams in the future. See the No Permissions for draw.io section.
After authorizing draw.io to your Google Drive, you can revoke the permissions to draw.io at any time, see the Managing Google Permissions section.
- Go to https://www.draw.io/.
You will be presented with this menu:

- Click on Google Drive.
- A small dialog box will appear:

- Click on Authorize
- A small pop-up will appear:

- Enter your full hawaii.edu e-mail address, then click Next.
Your full hawaii.edu e-mail address includes the @hawaii.edu. For example, mine is emeyer@hawaii.edu.

- You will be taken to the UH system login page, proceed to login with your UH username and password.
- After logging in, you will be asked to sign in to draw.io using your Google account.
Click Continue.

- In the next window, click on Select All. This will make it easier to save, open, and edit diagrams on draw.io from your Google Drive. Then click Continue.

- You can always change your permissions after this class, see the section Managing Google Permissions.
- Then you'll be presented with this menu:

- Now, when you go to draw.io, you'll be able to start a new diagram or open an existing one from your Google Drive. You can also open any draw.io files directly from your Google Drive instead of having to go to draw.io.
Managing Google Permissions
If you no longer wish to grant draw.io permission to your Google Drive, use this link: https://myaccount.google.com/connections
Click on draw.io, then click on Delete all connections you have with draw.io, then Confirm
You can also manage permissions for all third-party add-ons at the link above.
Light Mode / Dark Mode Appearance
By default, draw.io uses the mode you have set on your local computer. If you wish to toggle between Light Mode and Dark Mode, use the Appearance toggle in the upper right hand corner of the draw.io application.

Create New Diagram
Note: The following steps assume you have linked your hawaii.edu Google Drive with draw.io.
- Go to https://www.draw.io/.
- Click on Create New Diagram.
- You will be presented with this menu:
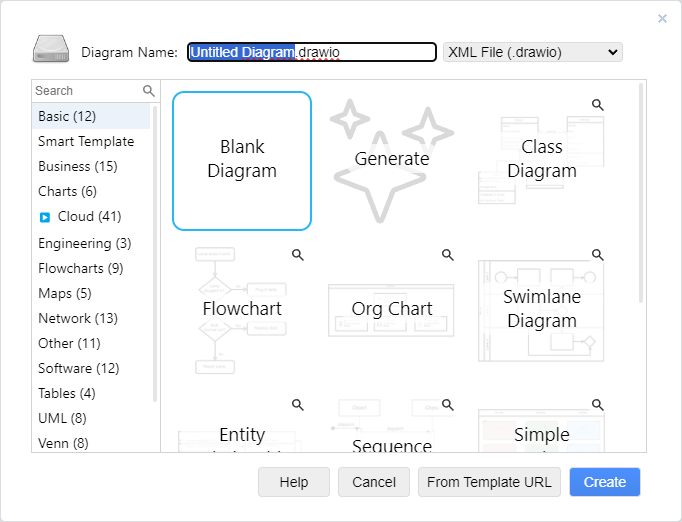
- Give your diagram a name.
For example:

- Click Create.
- You'll be taken into the draw.io application. Next, go to the File menu, then click Save.
You should be presented with the following:

- You can use the Where drop-down menu to choose where in your Google Drive to save the diagram. Leaving the option on Google Drive - My Drive will save directly in your Google Drive.
- After choosing where to save the diagram, click Save.
- As you make changes to the ER-diagram, draw.io will automatically save your progress at each change, much like using Google Doc.

draw.io Main Interface

- Menu Bar - Main menu area. Used to open, save, export, change orientation, etc.
- Appearance - To toggle between Light Mode and Dark Mode
- Toolbar - Provides quick access to basic functions such as zoom, undo, redo, etc.
- Shapes - Contains all pre-defined shapes separated by category. We will be using the Entity Relation and UML categories to create ER-diagrams. Click and drag, or click on a shape to add it to the drawing area.
- Drawing Area - The working area.
- Format Panel - A contextual panel that will change depending what is currently selected. When a shape is selected, all options to edit the shape will be shown here.
Landscape Orientation
To ensure there is enough room on the drawing area for ER-diagram, it is best if the orientation is set to Landscape.

Entity Relation Shapes
All the relevant shapes that are needed to create an ER-diagram from scratch can be found in Entity Relation and the UML category. Depending on your screen size, you may need to scroll down through the shape categories on the left side.

Creating an Entity
To create an entity, use the following shapes:
- Title
 - for the name of the entity (Found in the UML category)

- Entity
 - for the attributes of the entity (Found in the Entity Relation category)

Add both to the drawing area and position the Title shape above the Entity shape as shown:
- Modify the Title shape
- In the Text tab in the Format Panel, left justify the text and make the text bigger. Use size 19 pt.
- Double click on the title to edit the text.
- Re-position and re-size if necessary.
- Modify the Entity shape
- There are 2 parts, the upper part and the lower part. The upper part will be used for the primary key column(s), and the lower part will be used for all other columns.
- Double-click inside the upper part to enter the primary key attributes of the table.
- If you wish to expand the upper area because there are multiple primary key attributes, click outside the entity shape to de-select it, then click anywhere in the shape to select it, then click and pull down on the bottom orange diamond, shown here:
- Note: If you are editing the text, you will not see the orange diamonds.

- Double-click inside the lower part to enter all other non-key columns.
- Any foreign keys should be noted with (FK) after the attribute name.
- Make the text bigger: Use size 17 pt. for all attribute names, including the primary key attributes.
- Resize the entity shape if necessary.
- Independent/Dependent Entity
- By default, the entity shape uses rounded corners. Rounded corners indicate a dependent entity.
- To make sharp edges for independent entities:
- Select the entity shape itself, then uncheck the Rounded checkbox in the Style tab of the Format Panel.
- If you are editing text inside the entity, you will not get the correct option. Click anywhere on the border of the shape, then in the shape tools, click on the Style tab.

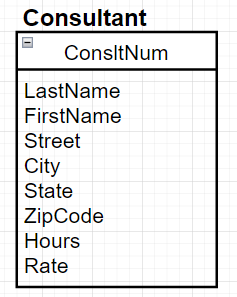
Example Consultant Entity
After creating the entity, you may want to group the title with the entity shape. Select both the title and entity shape, then right-click and choose Group or Ctrl+G. The advantage of doing this is that you can duplicate the entity to create another one instead of starting from scratch. Also, if you need to re-position the entity on the drawing area, you don't have to keep selecting both the title and entity shape.
Video Example Independent Entity (Consultant Entity)
Video Example Dependent Entity (OrderLine Entity)
Creating a Relationship
To create the relationship line between 2 entities, use an appropriate relationship line. It actually doesn't matter which you initially choose because you can modify the cardinality symbols later.
Since the most common relationship is 1 to Many, choose that shape.

Attach the ends of the relationship on the border of its respective columns. You should feel the line snap to the side of the entity. The snap is successful if you move the entity shape, the relationship line should also move. If the relationship line does not move with the entity, try again to attach the relationship line to the border of the entity. Be sure to place the line adjacent to the appropriate column name, do NOT place it randomly along the border of the entity.
- Identifying/Non-identifying Relationships
Modify the relationship line.- By default, the line is solid. Solid relationship lines indicate an identifying relationship.
- To make the line dashed for non-identifying relationships:
- Select the relationship line, go to the Style tab and use the top middle drop-down.

- Select the relationship line, go to the Style tab and use the top middle drop-down.
- Cardinality Symbols (one and many)
- To make changes to the cardinality symbols at the ends of the line:
- Select the relationship line
- Go to the Style tab and use the bottom middle and right drop-down menus.
- Bottom middle is for the start (left) symbol
- Bottom right is for the end (right) symbol.

Example Consultant-Client Relationship, 1 to Many using Crow's foot notation

The Consultant and Client entities are independent entities, therefore the relationship between them is non-identifying. Non-identifying relationships are signified by a dashed line.
A relationship between an independent (sharp rectangle) and dependent (rounded rectangle) entity is an identifying relationship. Identifying relationships are signified by a solid line. For example, the relationship between WorkOrders and OrderLine is an identifying relationship.
Video Example Non-Identifying Relationship (Consultant-Client)
Video Example Identifying Relationship (WorkOrders-OrderLine)
ER-Diagram Title
Finally, add a title to your ER-diagram.
Use the Title shape. Use a big font size, such as 35pt, and center the title at the top of the diagram.

Helpful Tips
- Undo (shortcut)
- Ctrl + z
- Change page orientation to landscape to have more horizontal room.
- File menu > Page Setup > Landscape > Apply
- Quickly zoom in/out
- Hold Alt or Ctrl key, then use your mouse scroll wheel up and down.
- Group related shapes
- Select the shapes you want to group, then Ctrl + G
- Note: When you group shapes, single-clicking on any component in the group will select the entire group. You can still edit the individual shapes in a group.
- To select individual shapes in a group, click on the shape again after selecting the group.
- Duplicate a selection
- Select the shapes you want to duplicate, then Ctrl + D
- This is helpful for creating entities.
Exporting Your Diagram
When you are done creating an ER-diagram, export it to an output format. By default, draw.io does not save using an output file format. An output file format is a .pdf or .png. Export your ER-diagram to your computer so you can distribute the ER-diagram or submit to Laulima.
- Click on File menu.
- Go to Export as.
- Choose PDF...
- You will be presented with this menu:

- Selection Only - will export only what you have currently selected. This option is disabled if nothing is currently selected.
- Crop - the smallest area containing everything
- Grid - add the gridlines to the export
- Include a copy of my diagram - allows the output file to be re-uploaded to draw.io for further edits
- Transparent Background - allows the background to be transparent if not filled in. Leaving this unchecked will fill the background with white.
- Use the same options shown in the picture above.
- Click Export.
- You will be presented with this menu:

- In the Where: drop-down, choose Device.
- Click on Save.
- Depending on your browser settings, your browser may download the PDF directly to your Downloads folder, or ask you where to save the PDF.
- To turn in the ER-Diagram for the assignment, locate the PDF on your computer and upload it to Laulima.
No Permissions for draw.io
If you don't want to give draw.io permission to your Google Drive, you will need to manually download the .xml or .drawio file as well as the output file format (ex. pdf). The source file (the file that will allow you to edit the diagram later) will either be an .xml or .drawio file.
- Go to https://www.draw.io/.
- Save diagrams to: choose Device.
- If you are creating a new diagram, click Create New Diagram.
- Give your ER-diagram a name.
- If you are editing an existing diagram, click Open Existing Diagram.
- Navigate to where the file is located on your computer and open it.
- Make the necessary edits or create your ER-diagram from scratch.
- Follow the steps in Exporting Your Diagram.
BITS Corporation ER-Diagram Example
The exported PDF of the ER-diagram can be found here. Feel free to upload the PDF to draw.io and play around with it.
- To upload the PDF to draw.io:
- Go to File > Import from > Device...
- You may need to change the page orientation to Landscape.
- Go to File > Page Setup... > Click on Landscape radio button > Apply
